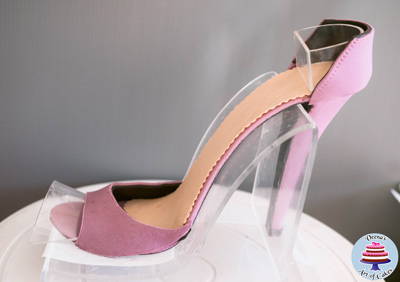
Gum Paste Stiletto Shoe Tutorial
Cake Tutorial by Veena Azmanov of Veena’s Art of Cakes
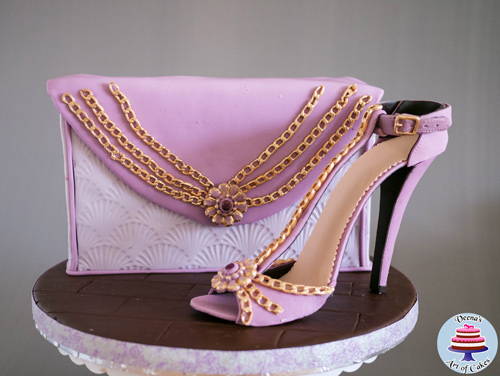
Create high fashion cakes when you add this stylish gum paste shoe to your cake designs. Here are Veena’s tips for success when following her step-by-step tutorial:
Tools and Supplies:
- Gum paste / Pastillage – Black, Violet and Ivory
- Templates – sole, front strap and back strap
- Shoe formers – store bought or DIY
- Silicone heel mold
- Scalloped Insole Silicone Onlay®
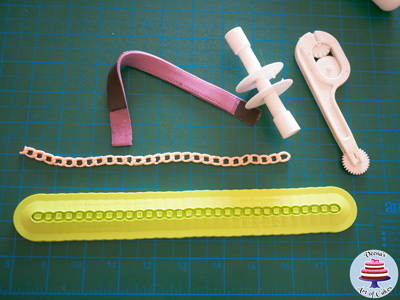
- Medium Chain Mold
- Small Buckle Mold
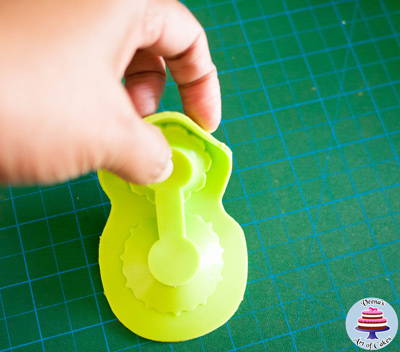
- Glimmer Brooch Mold
- Rolling Pin
- X-acto Knife
- Cornstarch dusting pouch
- Gum glue
- Paintbrush
- Gold luster dust
- Alcohol (vodka) or lemon extract
Timing is very important. Do not rush the process. The amount of drying time between steps can make a huge difference to the final look.
Use the right medium. It’s best to use either gum paste or pastilage for the heel and sole. Fondant with cmc does not dry as hard.
You can use fondant with CMC for other parts of the shoe, but getting the colors to match on different mediums is often difficult so I tend to use gum paste for the whole project.
Finding the right thickness to your paste is key. If your template pieces are too thin, they will be too limp to hold their shape. If they are too thick they will be too heavy and fall off easily and take too long to dry.
Use a clean and new Xact-o knife blade around the template. If you find your knife is pulling the paste, it means it’s time to change the blade.
Use gum glue sparingly. A little goes a long way. Too much will make the paste slide and not give you a good clean finish.
Use a pallet knife to cut off excess from molds instead of sharp knives so you do not cut or scratch your molds.
Heel: To expedite this process I prepare extra heels in black and let them dry several days.
Once I know the specific color for my shoe, I line the heel with the required color paste. This saves two days of waiting.
Instructions
1. Making the Heel:
Roll some violet paste into a smooth ball, then into a cone tapering at one end.


2. Fill the mold smooth sides in. Make sure you push the paste to all the corners of the mold snugly so you have a nice firm heel.
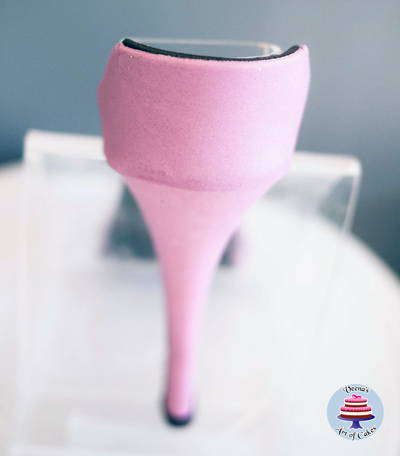
3. Cut off any excess paste on the top. Smooth any raw edges with your fingers. Place the mold in the freezer for 10 minutes. Do not try to remove the heel while it is soft as it may distort the shape. Once firm in the freezer, unmold by gently using your thumb on the back of the mold and teasing it out.


4. Re-adjust the shape making sure it is straight and smooth. There will be some condensation which will dry in a few minutes. Before you leave the shoe to dry hard, it is a good idea to have a skewer inserted into the heel to help balance the shoe on the former as well as the final cake, later.
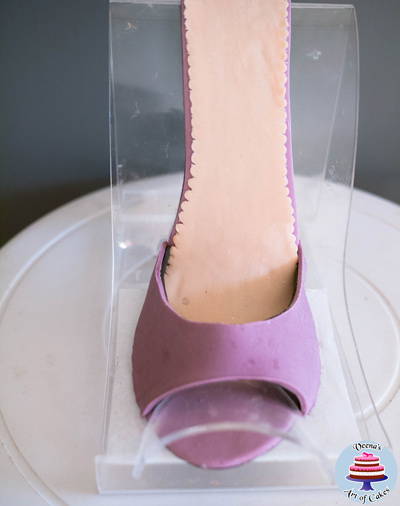
5. Leave the shoe to dry for at least a couple hours or overnight. I usually leave it for at least two days. (read tips above) Once dry, roll some thin black paste and cut the inner lining of the heel as well as the heel tip, as shown.


6. Making the Sole:
Once the heel is dry, place it on the shoe former so we can continue to make the sole.
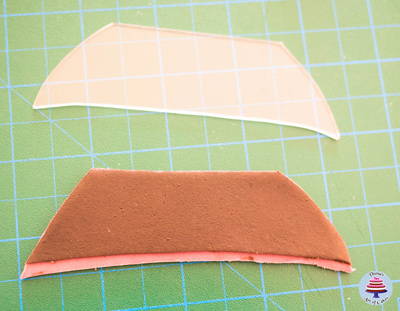
I have to use non-toxic tape to secure my heel to the acrylic former, but you may also use the skewers to secure the heel to a Styrofoam former. Roll some violet past fairly thick (about 1/4) inch and some black paste fairly thin (about 1/8 inch).
7. I find the best way to cut these exactly the same is to place the violet paste on the black paste. Then place the template on the paste and cut out cleanly with an Xact-o knife. Once you cut the sole, run your finger around the edges to remove any sharp corners. Using gum glue, attach the sole to the heel. Make sure the edges of your sole sit snugly on the heel. You should not see the heels edges. Let dry an hour or so before you roll some ivory paste for the inner sole.


8. Roll the paste thin, about 1/8 inch, and place it on the Scalloped Insole Silicone Onlay®.
Use your rolling pin, roll lightly and let the blades on the mold give you a nice clean cut.
9. Use gum glue again to place the inner sole on the violet sole. It’s best to let this dry completely for a day or overnight.


10. Adding the Front Strap:
Roll the violet and black paste fairly thin. Using your template, cut out the front strap.
11. Notice the black insole is cut slightly smaller than the violet. Do this by just cutting a thin strip from the edges of the black paste. This will create a little ledge for the violet to sit on the sole.

12. Using a stitching tool, you can create stitch lines on the top two sides of the strap.
Now using some support (former / tissue paper or cling wrap), attach the front strap to the two sides of the sole. Place it so that the black paste edge is resting on the sole while the violet wraps around the sole. Let dry for a few minutes.
13. Making the Back Strap:
The back strap is made exactly the same way as the front strap. Roll both the violet and the black paste fairly thin. Cut the paste with an Xact-o knife using the template.

14. Again, cut the paste slightly smaller on the longer side to create that ledge.
15. Using your stitch tool, create stitch lines on the top three sides only. Using gum glue and some support, attach the back strap to the heel. The inner black paste edge should be resting on the inside of the heel while the violet should wrap around the heel giving you a nice smooth finish.
16. Let this dry well before you add the ankle strap.
17. Making the Front Pattern:
One your front strap is fairly dried, you can create any design you choose. Here, I am using the Medium Chain Mold and Glimmer Brooch Mold. The brooch mold is used the same as all others. You can either create the decoration with Isomalt or with gum paste. I am using the same violet paste.
Dust the mold with a little cornstarch, then dust off any excess. Roll the paste to a smooth ball. Place in the mold smooth side down. To unmold, just bend the mold enough to let the brooch fall out naturally so you don’t distort the shape. Let the mold rest on the counter top for a few minutes so it will firm and be easier to handle.
The chain mold – If done correctly, this mold can be very easy to use.
1. Dust the mold with a little cornstarch.
2. Roll the paste into a long thin sausage.
3. Place the sausage in the mold and tease the paste in.
4. Cut off any excess on the top. You should see the rings as see in the picture above.
5. To take the paste out, flip the mold over and bend it so the rings can be gently dropped with as little help as possible so as not to stretch the paste.
6. This is very delicate and so handle with care and as little as possible. Place each piece on the strap with a little sugar glue. You can join the broken piece but pay attention to the design. It must look like it has loops in the chain.


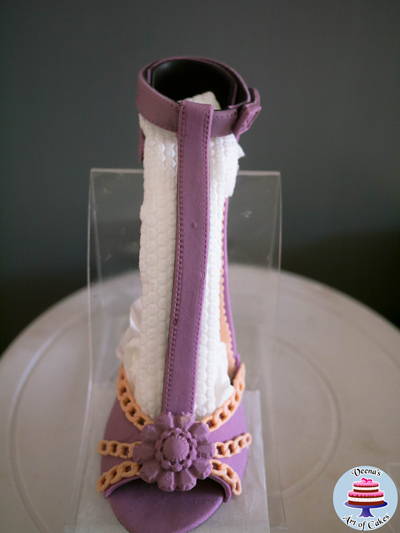
18. Adding the Ankle Strap:
Roll some violet and black paste. Place the violet on the black paste and cut a long strip about ½ inch in width. Measure the length you need for the ankle strap and cut. Use a stick tool to create stitch lines.
Neatly wrap the strip around the ankle strap with a slight overlap as shown in the picture. Leave to dry a few minutes to an hour.
19. To make the buckle, I have used the Small Buckle Mold. Dust the mold with a little cornstarch, roll a small piece of violet paste into a sausage, place in the mold and cut of any excess. Flip the mold over and you have a buckle!!


20. Use a tiny amount of sugar glue to attach to the end of the ankle strap.
21. Making the Front, Long Strap:
Make a two tone strap with violet and black the same way we did the ankle strap. One end of the strap goes under the front strap, so cut out an inch of the violet paste so it’s not too bulky. The other end forms a loop around the ankle strap, so take off and inch of the black. Use the stitch tool to create stitch lines. Mold the center brooch decoration using the Glimmer Brooch Mold.
22. To do this successful, you need to ensure you have enough support under the strap, so keep some paper hand towel handy. Add a little sugar glue under the front strap and around the ankle strap.
Place the strip on the support first. Then slide the strap under the front strap – use a tool to ensure that the strap is attached and supported. Wrap the other end securely around the ankle strap to form a loop
Let this dry completely before you take the support off. Make the chain the same way we made them earlier for the front strap. Just ensure you have one nice long piece of chain. Add a little glue on the strap and attach the chain. Add the other chain details as shown, attaching with gum glue. Place the gum paste brooch in the center.
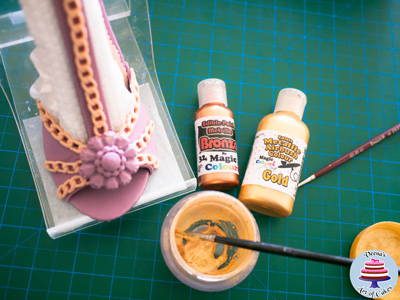
23. Painting the Gold:
Once all the elements are on the cake and almost dried, paint them with metallic gold luster. I mixed some gold luster dust with vodka. You can also use lemon extract. Make a thick paint consistency and using a suitable brush just brush on the gold paint. You can use one or more coats to achieve the look you want.
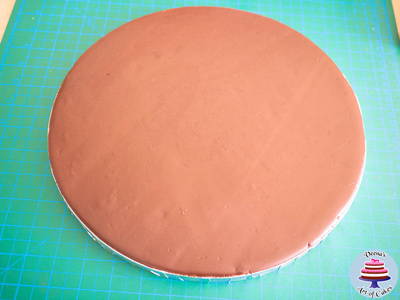
24. Making the Board:
The board I made for this cake is fairly simple. Roll some brown sugar paste about 1/8 inch thick. Brush the board with some water and smooth the paste on the board using a smoother. Cut off the excess and smooth the raw edges.

25. Using the straight edge and width of a rule create lines.
26. Next make vertical lines in between those, as shown below.

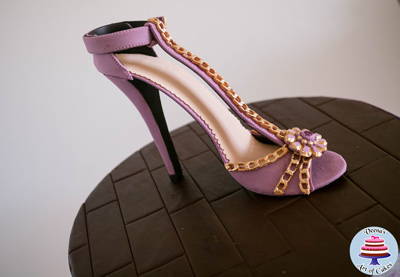
27. Let the board dry for a while before you place the gum paste stiletto shoe on it.
