Couture Lace Cake Tutorial
Cake Tutorial by Ted Scutti & Adam Starkey of Sugar Sugar Cake Studio
Originally printed in the April/May issue of American Cake Decorating Magazine!
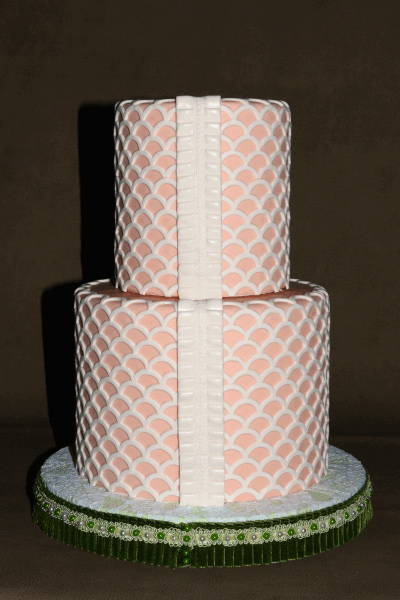
Intricate lace on a couture wedding gown serves as the inspiration for this couture lace cake design. Layer upon layer of texture and luxurious dressmaker details like pleated seams and pearl beading create visual impact on the original dress as well as this cake.
Tools and Supplies:
- Ann Right Lace Mold
- Feather Crest
- Rose Lace Mold
- Rose Mary Lace Mold
- Ruth Lace Mold
- Virginia Left Lace Mold
- Virginia Right Lace Mold
- Scalloped Lattice Silicone Onlay® – Background lace mold
- Pretty in Pleats -Vertical border mold
- Lydia Lace Mold – Horizontal border mold
- Tailor’s tape or ruler
- Rolling pin
- Pasta machine
- Fondant smoother
- Safety scalpel (#11 blade)
- Tweezers
- Gum paste
- Cake tiers (or dummies) in desired diameters and heights
- Cake board
- Rolled fondant
- Gel color (Wilton Creamy Peach)
- Sugar pearls: 4mm, 6mm and 8mm
- White piping gel

Instructions
Complete Steps 1 through Step 4 in advance of decorating the cake. These steps can be time-consuming (especially for larger cakes) because of the number of pieces that need to be prepared.
1. Make the background lace pieces that will cover the sides of the tiers.
Determine the circumference of each tier and add an inch to allow for the rolled fondant covering. The easiest way to do this is to run a tailor’s tape around the outside of each cake pan to be used to bake the cake. Calculate the amount of background lace needed for each tier by dividing the circumference of each tier by the length of the background lace mold. Mold an extra piece of background lace per tier in case it’s needed.
Any edible lace can be used for the background of the couture lace depending upon the desired look.
We used the Marvelous Molds® Scalloped Lattice Silicone Onlay® to form our background lace from sheets of gum paste. We sheeted the gum paste by rolling it out on a work surface with a rolling pin. We then ran the gum paste through a pasta machine to ensure an even thickness.
Our 7” tiers were taller than the Silicone Onlay® mold so we “stacked” a second row of the scalloped lace on the sides of our tiers so they would be completely covered. We made double the amount of background lace to give us enough for stacking.
As alternatives, confectionary lace molds from Crystal Candy™ or SugarVeil™ can be used to create the background lace. Select a clean and simple geometric design to create a desirable background. Very detailed background lace with elements like flowers, birds, butterflies, etc., can be distracting with the addition of gum paste lace details over the background lace.
Freeze the gum paste background lace pieces between wax paper in an airtight container until needed. Alternately, confectionary lace like Crystal Candy™ or SugarVeil™ should be stored in an airtight plastic bag and not frozen.
2. Mold the vertical border pieces that will hide the background lace seams. Measure the height of the tiers with a tailor’s tape or a ruler. Calculate how many vertical border pieces are needed to hide the background lace seams on the backs of all the tiers. Mold an extra piece per tier in case it’s needed.
We used the Marvelous Molds® Pretty in Pleats Mold to form our vertical borders from sheets of gum paste. We chose the Pretty in Pleats mold because it creates a dress-like effect on the tiers. The width of the mold also allows flexibility in hiding the background lace seams.
Freeze the vertical border pieces between wax paper in an airtight container until needed.
3. Mold the horizontal border pieces for the base of each tier. Reference the circumference of the tiers determined in Step 1. Calculate the amount of horizontal border pieces needed for each tier by dividing the circumference of each tier by the length of the horizontal border mold. Mold an extra horizontal border piece per tier in case it’s needed.
We used the Marvelous Molds® Lydia Lace Mold to form the horizontal borders from sheets of gum paste. Freeze the horizontal border pieces between wax paper in an airtight container until needed.
4. Mold the decorative lace elements. A variety of decorative lace elements makes the overall lace on the finished cake look realistic. Select lace molds that coordinate well with one another. Choose molds of various sizes to enhance the texture on the cake. We used eight lace molds from a coordinated collection in order to achieve our design for this cake.
Determine how many decorative lace elements to mold for the cake. Mold a few sample decorative lace pieces from the selected molds and work with them until a pleasing arrangement is found. Document the preferred design (e.g., take a picture of the design with the camera on a Smartphone) to reference during the assembly process. Estimate how many times the design will be placed on the cake and then determine how many pieces of gum paste from each mold will need to be made. Mold extra pieces in case they are needed. (Note: At least one extra is always needed.)
We used the following Marvelous Molds® to create the decorative elements for our lace:
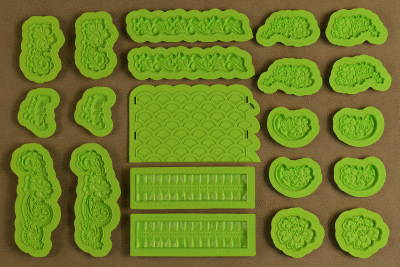
- Ann – Left
- Ann – Right
- Feather Crest
- Rose
- Rosemary
- Ruth
- Virginia – Left
- Virginia – Right
Freeze the decorative lace elements between wax paper in an airtight container until needed.

5. Cover the tiers in rolled fondant. Before covering the tiers, tint the rolled fondant in a pastel shade to contrast with the white lace. For this cake, Wilton Creamy Peach was used to color the pastel peach rolled fondant.
Alternately, use white fondant with white or light ivory lace for a monochromatic (e.g., white-on-white) look.
Note: It is easiest once the base tier is covered in rolled fondant to attach it to the cake board. For a stacked cake, it is also easiest to stack and dowel the tiers once they are covered in rolled fondant before adding the lace decorations.
6. Attach the background lace to the tiers. Remove one piece of background lace from the freezer at a time. Do not remove more than one piece because the second piece will thaw quickly and become too flexible to adhere precisely.
Note: The gum paste will pick up moisture from the freezer even thought it was stored in an airtight container. Usually the moisture from the freezer will be adequate to adhere the background lace to the rolled fondant on the cake. If weather conditions demand it, apply small dabs of royal icing, gum glue or water to ensure a firm bond.
Allow the background lace piece to warm up for a few seconds until it just becomes pliable enough to apply to the curve of the cake. Place the first piece of background lace starting on the back of the tier. Use a fondant smoother to adhere the background lace piece to the side of the tier.
Continue adding background lace around the circumference of the tier aligning each piece with the previous one. The final lace background piece may not align perfectly with the first piece. This is not a concern because a vertical border will be added in the next step to hide the seam. Use a scalpel to cut any excess lace from the final background piece so that it will fit perfectly where it meets the first piece.

If the tier is taller than the background lace mold, apply a first row of lace pieces all the way around the base of the tier. Then add a second row of background lace on top of the first to completely cover the sides of the tier. Place the background lace so that the final row of scallops extends slightly up and over onto the top of each tier.
Apply background lace to all of the tiers. Align all the seams from the tiers on the back of the cake for a neat appearance.
Note: Do not worry about any minor seams between pieces of background lace. Seams will be hidden with decorative lace elements and sugar pearl accents in later steps.

7. Attach the vertical borders. Remove one vertical border piece from the freezer at a time and attach it to the cake as described in Step 6.
Start with the top tier. Hold the frozen vertical border piece against the background lace seam and determine if it needs to be cut before it is applied. If needed, cut the frozen vertical border with a scalpel where the lace will touch base of the tier.
Apply the vertical border to hide the seam where the background lace comes together. Use a fondant smoother to keep the edge of the vertical border straight.
Apply the vertical borders to the remaining tiers as described above.
Note: If the Marvelous Molds® Pretty in Pleats Mold is used to create the vertical borders, make sure that all of the pleats face the same way on the entire cake. The pleated border that this mold produces has a direction to it and all of the pieces need to face the same way for consistency. Check for consistency before attaching each vertical border piece when using this mold.
8. Attach the horizontal borders around the base of each tier. Remove one horizontal border piece from the freezer at a time and attach it to the cake as described in Step 6.
Cut the end of the first frozen horizontal border with a scalpel where the horizontal border will meet the vertical border. Attach the horizontal border to the tier. Gently press the horizontal border onto the tier and the moisture from the freezer will adhere it into place. Match the horizontal border pieces around the tier. When applying the final horizontal border section on the tier, use a scalpel to create a clean cut where the horizontal border will meet the vertical border.
Repeat to add a horizontal border to each tier on the cake.
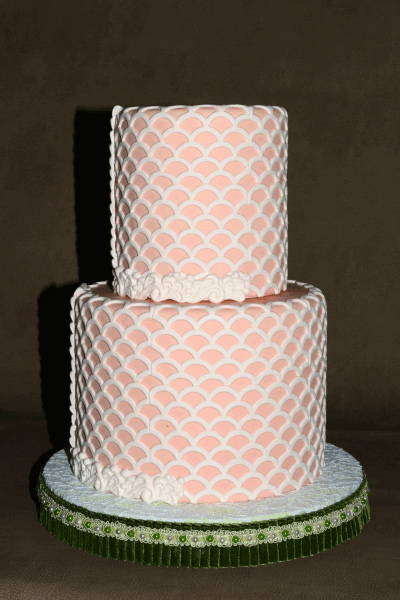

9. Accent the borders with sugar pearls. Add 4mm sugar pearl accents to the vertical and horizontal borders. Use tweezers to dip the sugar pearls into a bit of white piping gel before applying them to the lace. Gently press the pearls into the gum paste to adhere them.
Apply the sugar pearls to the borders at regular, consistent intervals to ensure a neat appearance.
10. Attach the decorative lace elements and accent them with sugar pearls. Remove the decorative lace elements from the freezer a few at a time and attach them to the cake as described in Step 6.
Apply the decorative lace elements onto the background lace following the pattern determined in Step 4. If a photograph was taken of the design in Step 4, reference it as a template. For variety, rotate the pattern as the decorative lace elements are placed around the cake. Rotating the reference photo will make it easier to keep the design consistent across the cake.
Alternately, apply the decorative lace elements randomly to the background lace. Start with larger decorative lace elements and fill in with smaller decorative lace elements.
Add 4mm sugar pearl accents to the decorative lace elements as described in Step 9.
Work around the tiers adding decorative lace elements with sugar pearl accents.
Use a scalpel to cut the decorative lace elements that touch the vertical borders. A clean seam between the gum paste elements creates a convincing lace effect.


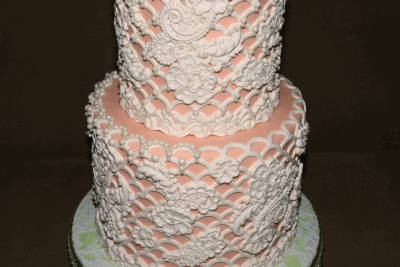

11. Accent the background lace with sugar pearls. Once all of the decorative lace elements have been placed on the cake, attach (as described in Step 9) a 6mm sugar pearl with a 4mm sugar pearl directly below it at each scallop intersection on the background lace for the entire cake except for the top two rows of scallops. This will hide any remaining visible seams where the pieces of background lace are joined together.
Outline the top row of scallops on each tier with alternating 6mm and 4mm sugar pearls as shown in the photographs. This creates the impression of very finely detailed lace.
On the second row of scallops from the top, stack 8mm, 6mm and 4mm sugar pearls at each scallop intersection on the background lace. This completes the couture lace cake design.
If desired, add handmade floral elements to the cake for more interest. Spray glitter with spray glaze. Attach bottom tier using hot glue (If using real cake, your cake should be on a thin cardboard cakeboard).

Ted Scutti and Adam Starkey own Sugar Sugar Cake Studio in Phoenix, Arizona. Their boutique bakery is renowned for luxurious one-of-a-kind wedding and specialty cakes. Their world-class sugar art has been featured in national and international media. Ted and Adam teach fun and informative handmade floral and sugar craft classes.
View their work at www.sugarsugarcakestudio.com and keep up with their current projects on Facebook at https://www.facebook.com/SugarSugarCakeStudio.